Free Fun Friday – Father’s Day Key Chain

Father's Day, gift, handmade, milk bottle lid, kids, craft

Father's Day, gift, handmade, milk bottle lid, kids, craft Father’s Day in Australia is only a little more than a week away, so if you need a gift for dad or granddad, we have something quick, cheap and easy for you to make.

Father's Day, gift, handmade, milk bottle lid, kids, craft, recycling

Key Chain Attached to Key Ring

It is a fun key chain that is made by recycling a juice or milk bottle lid, and it will cost almost nothing to create.

Father's Day, gift, handmade, milk bottle lid, kids, craft

Key Chain Supplies

We have three different key chain designs you can choose from, each with a phrase (group of words) that go with the design.  We love the way the shapes move around under the cellophane!

Father's Day, gift, handmade, milk bottle lid, kids, craft

Key Chain Fronts

Father's Day, gift, handmade, milk bottle lid, kids, craft

Key Chain Backs

You can easily change the look of them by changing the colour of the lid, paper and cord (and ribbon if you use it), so we would love to see yours when you are done!  If you go to our Father’s Day Key Chain Gallery you can upload your photo there.

Father's Day, gift, handmade, milk bottle lid, kids, craft

Key Chain Sides With Ribbon

We have full instructions and diagrams to make the Father’s Day Key Chain, which are easy enough for children to follow, so just click on the button below.

Father's Day, gift, handmade, milk bottle lid, kids, craft

Happy crafting, and happy Father’s Day to all the dads and grandads!

Free Fun Friday – Supplies Box

Supplies box, Imagine Make Believe, cardboard box, decorated

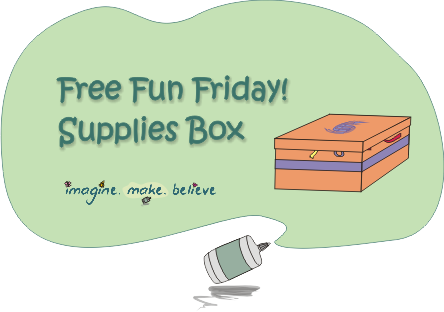
Decorated Supplies Boxes

Imagine Make Believe - box, cardboard, recycle

Every creative person needs one box.  Well, that’s what we think over here at Imagine. Make. Believe!

Janelle loves boxes and containers especially little ones to store all sorts of treasures.

Annie likes boxes, because she likes to collect things, and is always needing a spot to store stuff.  Unfortunately, she can’t always remember where or which box she has put her treasures in.

JJ also likes boxes.  He uses cardboard cereal boxes to make all sorts of things, and will be putting a tutorial to make something fun from them on his own website soon.

Cris recently featured ten random facts about boxes on his website… have you ever wondered about who invented the cardboard box?

Elissa doesn’t seem to use boxes and containers as much as the rest of us, although she does use them for storing her toys!

Maybe you are a bit like one of us?

In our new Imagine. Make. Believe magazine coming in September, you will find lots of craft and sewing things to make, so we thought you might like to start collecting the tools and supplies you will need, now.  We don’t use anything that costs lots of money or too hard to find, but we did think that your parent would like all your supplies in one box, and not in ten places around the house.

We also don’t think they want an ugly looking cardboard box lying around the house, so we have come up with some ideas to make them look great!
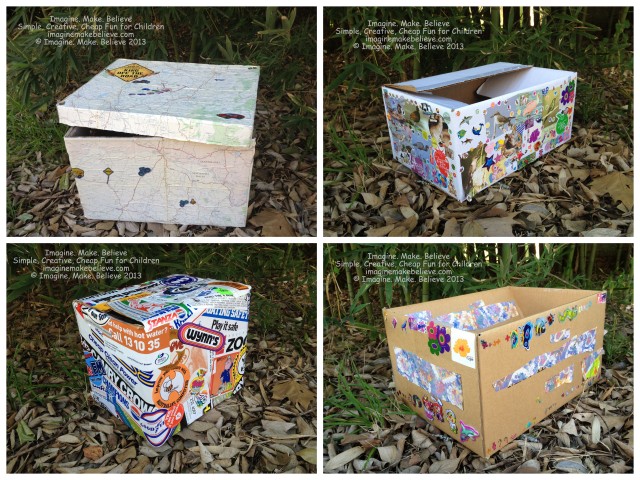
Supplies box, Imagine Make Believe, cardboard box, decorated

Box

You can use almost any type of box that doesn’t have large holes in – you don’t want to lose anything through the holes.  We think it is best if it has a lid, or flaps that fold down, so here are some suggestions:

  • Archive box
  • Fruit box
  • Box from the grocery shop or hardware store
  • Plastic container, box or crate with lid
  • An old cooler or esky
  • Large shoe box

Covering

If you are using a cardboard box with writing on it, it is good to cover the whole box with something that looks nice, or  you can just cover the words if there are not too many.

Supplies box, Imagine Make Believe, cardboard box, decorated

Covering Options

There are all sorts of things you can use including:

  • Paint or painted pictures
  • Maps
  • Wrapping paper
  • Magazine pages or junk mail
  • Old calendars
  • Brown paper
  • Plain paper if you want to add your own decorations
  • Self adhesive (sticky backed) book covering scraps
  • Collaged paper, pictures or words – make a collage with coloured paper scraps, pictures from magazines, or words scattered all over
  • Printed photo or picture – print out your favourite photo or picture and glue it on
  • Drawings
  • Stickers – if you want to cover your whole box with stickers, you will need lots
  • Tissue paper – tissue paper is usually see through, so if you want to cover over words, you may need to glue down some other paper first
  • Old sheets of music

We found the easiest way to cover a large box with large sheets of paper, was to:

  1. Place the side of the box down on the paper, and trace around it with pencil.
  2. Take the box off the paper.
  3. Cut along the line on the paper you just traced.
  4. Spread PVA or craft glue with a paint brush onto the side of the box that you just traced around.
  5. Carefully line up the cut sheet of paper over the glue, lining up the edges of the sheet and box.
  6. Gently press the middle of the sheet down with your hand and smooth it onto the box, by smoothing out from the centre.
  7. Continue tracing, cutting and gluing around each side of the box, and lid, and allow to dry.

Decoration

Once you have covered your box, or if you already have a nice one, then you can decorate it to complete your very own supplies box.  It is a good idea not to have anything that can easily get knocked off the outside of your box, so smooth, flat things are best.
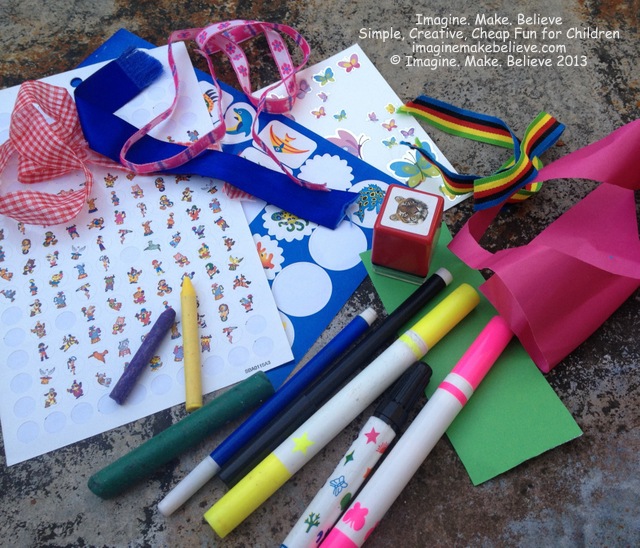
Supplies box, Imagine Make Believe, cardboard box, decorated

Decoration Options

Here are some suggestions of things you could use:

  • Glitter Glue – draw pictures or write with glitter glue.
  • Stickers
  • Crayons, felt tip pens, watercolour or acrylic paint and pencils – you can make patterns, splashes of colour, drawings, or lots of colourful writing.
  • Ribbon using double sided tape to glue it down, although you can use PVA or craft glue to glue it on a paper surface, although this can be very messy.
  • Decorative tape – sticky tape sometimes comes in pretty designs, and you can use it a bit like ribbon with strips of it across your box.  Washi tape is another type of tape that can be used the same way.
  • Stencils can be used to make patterns or pictures.
  • Stamps and inkpads are a quick and easy way to decorate a plain box, but if you don’t have either of those things, you can use paint and chopped potatoes (cut into a square or triangle shape), the end of a carrot or other sliced fruit or vegetables to make your own stamps.  Wire, foam stickers and different size lids can all be used too.  Later in the year we will have a Free Fun Friday about this!

Inside

Some of the children here at Imagine. Make. Believe wanted to have a few compartments inside their box to hold smaller items, so they don’t get lost in amongst other supplies.  If you do this too, you will need to leave a large flat area inside your box for sheets of paper and other flat items.
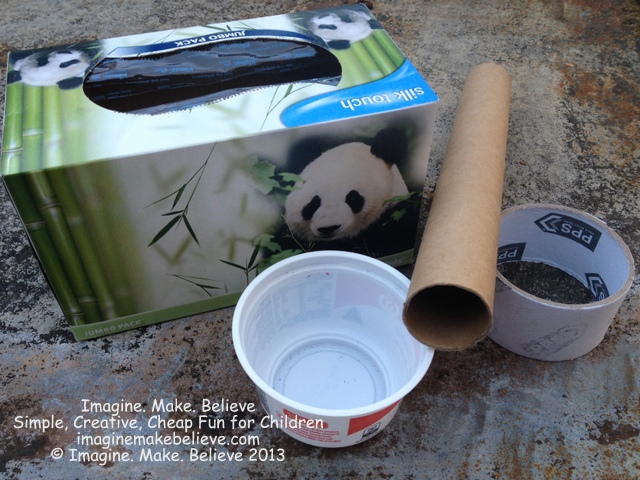
Supplies box, Imagine Make Believe, cardboard box, decorated

Compartment Options

Here are a few ideas that you could use to have some sections or compartments in your own box:

  • Clean and washed food containers (yoghurt, cream cheese, margarine, powdered milk drink tins, etc)
  • Cardboard tubes
  • Small boxes
  • Plastic containers

You can decorate them too, to match the outside of your box.  They can be glued in the box, or glued onto a cardboard ‘shelf’, or if they have a lid, you might like to sit them on the top of your supplies.

Supplies box, Imagine Make Believe, cardboard box, decorated

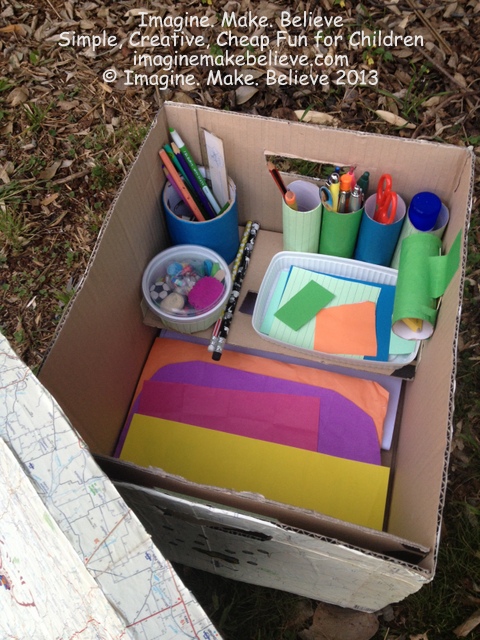
Supplies Box Inside with Compartments

So go find a box for your supplies and tools, (don’t forget to talk to your parent about it to make sure they are happy with the box you have chosen), and have fun decorating!

You may have seen some of these ideas before here at Imagine. Make. Believe. That’s because we use them to cover school books!  See our Free Fun Friday – Book Covers post for more details.

Free Fun Friday – Apron

Imagine Make Believe, children, kids, sewing, quick easy apron

Imagine Make Believe, children, kids, sewing, quick easy apron

Do you like to cook, paint or do messy craft?  If so, you may find that you need an apron to protect your clothes.  One of the easiest, quickest aprons to make is from a tea towel or dishtowel.  Tea towels usually have a nice hem all the way round, which means there are no scruffy or fraying edges of fabric, so they are easy to convert into an apron, with two folds, some stitching, and cord attached.

We have full sewing instructions and diagrams on converting a tea towel or dishtowel into an apron, so click the button below and have fun making your very own apron.

Imagine Make Believe, children, kids, sewing, quick easy apron

We would love to see your tea towel or dishtowel aprons, so once you have finished your apron, visit our Tea Towel Apron Gallery and upload your photo so we can all have a look!  Here’s one of our finished aprons!

Imagine Make Believe, children, kids, sewing, quick easy apron

If you enjoy cooking, crafting, or having fun, you can look forward to our themed fun recipes, crafts and games in our upcoming Imagine. Make. Believe magazine, which will be launched soon.

Back to School Uniform & Activity Chart

Back to School, Free, Children, uniforms chart

Back to School, Free, Children, uniforms chart

This week on Free Fun Friday, we are giving away a free printable School Uniform and Activity Chart.  We find that with four children at school, we get a bit muddled about what uniform we need to have for what day.  Some days its sports uniform, and other days it is formal uniform, and every child seems to need a different uniform on a different day.  Then add in tuck-shop, choir practice, music practice, library books, show and tell and so on, times four, and you can see why we may forget or get confused!  And just when we start remembering it all, it changes again, which it seems to do each term or semester.

We have designed the School Uniform Chart so that it can be printed and laminated and put on your fridge, or on the door or wall.  All you need to do is click on the School Uniform and Activity Chart button below, and:

  • Print it on two separate sheets of paper (it will fit perfectly on an A4 size sheet as is, so there is no need to have it ‘reduced to fit’).
  • If there is more than three children in the family, you will need to print two copies of each sheet.
  • Before you laminate them, neatly write each person’s name on the dotted line next to a row on the first page.
  • Laminate the pages separately.
  • Once laminated, cut along the light grey lines on the second page.
  • Stick the first page up somewhere where everyone can see it.
  • Choose the pictures from the second page that you need for your chart and stick some sticky putty on the back of them and then place them on the appropriate days on your chart.
  • When the pictures are not in use you can store them next to your chart.

Back to School, Free, Children, uniforms chart

We hope this helps your family to be more organised during the school week, so let us know how it goes!  We wouldn’t be without ours!

Free Fun Friday – Book Covers

Children, back to school, kids, book cover

Children, back to school, kids, book cover

Today’s Free Fun Friday is all about school book covers.  Over the years of covering hundreds of books, we have tended to stay away from self adhesive book coverings, because they are tricky for children (and often adults!) to use. During that time, we have come up with a list of fun and easy ideas that can be used along side our How to Cover Books tutorial.

Book Cover Base 

This is the main material for the book cover – the stronger the better, so if it has some plastic in it, rather than just paper, that is ideal.  If this is not possible, you can cover thin paper with a layer of clear book plastic.


Children, back to school, kids, book cover

Book Cover Base Examples

  • Painted pictures that are usually done on heavy duty paper and have been made throughout the previous school year make colourful book covers and can be admired all through the year.
  • Maps are good for covering books because they are usually one large piece of paper and they look great.  They are perfect for covering geography books!
  • Wrapping paper is fun and colourful, although it can be thin, so it may need a layer of plastic over the top.
  • Newspaper can make book covers interesting, especially the puzzle or colourful comic pages, although you will probably need to use a plastic layer over the top, as newspaper is usually thin.
  • Magazine pages or junk mail are also sources of interesting paper, however, they are usually not big enough to cover a whole book with.  They can be joined together with sticky tape or glue to make one larger sheet, or glued onto the book cover or plain paper and then covered with plastic.
  • Old calendars usually have colourful pictures that look great, and if they are not large enough to cover the book, they can be joined together with glue or sticky tape to make a larger piece, or glued onto plain paper or the book cover itself and then covered with plastic.
  • Brown paper often comes in large rolls and is often a cheap choice for book covers.  It is perfect if you want to add decorations or pictures, but will sometimes need a plastic covering.
  • Plain paper is also a good choice if you have large sheets of it, and want to add your own decorations.
  • Ream paper wrappers – when you buy a packet of white paper in a ream (500 sheets) it comes wrapped up in a a special wrapper to keep the moisture and dust out of it.  The wrappers are often plastic coated and this makes them very durable and long lasting.  These are actually our first choice for book covers! The problem is that you may not use enough reams of paper to cover all your books with wrappers, even if you collect them all year like we do, however you might be able to find a business or some friends who use lots of paper, and ask them if they can save you the wrappers.   There are some tricks to using these wrappers, especially if you want to decorate them:
    1. You or whoever opens the wrapper will need to carefully open them to avoid tearing them.
    2. They will usually need to be trimmed quite a lot, unless you have large books.
    3. We normally use the plain side (normally white) up and draw pictures with felt tip pens or markers, however, it is often waxy or glossy, and if it is, you will need to use special marker pens that don’t rub off.  After lots of experiments, we found Bic Mark-It Permanent markers the only ones that work on the waxy surface… on the packet it says they work on glass, metal, plastic, photos, foils, coated paper, oily and damp surfaces.
    4. You may need a different sticky tape when you come to cover the book because normal sticky tape may not work – we use a type of ‘magic tape’, which is a matte tape, rather than glossy, or you could try masking tape, or electrical tape, but we haven’t used them so we are not sure how they will work.
  • Plastic coated food packaging – sometimes food comes packaged in paper and often has a plastic or waxy coating on one side.  Use it in the same way as the ream paper wrappers above.  
  • Self adhesive backing paper – if a friend or family member has been covering books with self adhesive book covering, they will have a free supply of useful book cover paper, which normally goes in the bin.  The smooth glossy sheet that the sticky plastic sticks to, is so good for book covers because the glossy sheet has a plastic type coating on it which makes it last longer than plain paper.  We have used it lots of times, but there are a couple of tricks to using it:
    1. To decorate it, we usually use felt tip pens or markers on the non-glossy side, but you will need to do that before you cover the book.  You should be able to see the marks or drawings on the glossy side when you flip it back over.  
    2. Just remember that everything will be reversed when you cover the book, because the glossy side will face out.  The drawing will actually be on the inside, so the picture will be seen back to front when it is finished.  So if you want to write words as part of your decoration, you will need to write everything backwards for it to come out the correct way on the cover. 
    3. Whatever you draw on the left hand side of the paper will appear on the front cover and don’t go too close to the edges as that part will get folded over to the inside
    4. You will need a different sticky tape when you come to cover the book because normal sticky tape won’t work – we use a type of ‘magic tape’, which is a matte tape, rather than glossy, or you could try masking tape, or electrical tape, but we haven’t used them so we are not sure how they will work.

Book Cover Decoration

This can be anything that you use to decorate your books or your book cover base with.  It is usually best if your books are decorated only with flat objects.  In most cases, we recommend that you cover your books before decorating them, because then you can see exactly where you want your decorations.  Sometimes you will need to decorate the book cover base first, especially if the decorating will get messy (like paint!).  If you are decorating before you cover the book, you will need to keep a few things in mind:

    1. Don’t have your decorations go too close to the edge if you want to see them, because the edges will get folded over to the inside.
    2. Whatever you do on the right hand side of the book cover base will be the front cover, and the left hand side will be the back cover.
    3. You can fold the book cover base in half to show the middle line which divides the front and back cover, making it easier to see where you will put things.

      Children, back to school, kids, book cover

      Book Cover Decoration Examples

  • Coloured scraps of self adhesive (sticky backed) book covering – if you happen to use self adhesive book covering, you usually snip the corners off before you fold the edges down.  You can use these ‘corners’ (triangles) to make great patterns on book covers or stick them straight onto spiral bound books – we love using them on art books!
  • Collaged paper, pictures or words – make a collage with coloured paper scraps, pictures from magazines, or words scattered all over.
  • Printed photo or picture – print out your favourite photo or picture and glue it on.
  • Drawings – the children here love to draw their own pictures, and sometimes they like to write or draw things on their book cover base that is to do with the subject that the book will be used for.
  • Glitter Glue – draw pictures or write with glitter glue, or use it to highlight the favourite part of your picture.
  • Stickers – stickers are great for decorating book covers!  You could use them to make a picture on your cover.
  • Pressed flowers and leaves that have been pressed and dried between old phone books for weeks can be glued onto your book cover base.  If you do this, it is best to cover the book with plastic as well to protect the dried pieces.
  • Crayons, felt tip pens, watercolour or acrylic paint and pencils are all great to use on a plain book cover base – you can do patterns, splashes of colour, drawings, or lots of colourful writing.
  • Ribbon is a simple but nice decoration for your book covers, and double sided tape is probably the best way to glue it down, although PVA or craft glue can be used to glue it on a paper surface, although this can be very messy.  You can just put one stripe down the side of your book, or a few!
  • Decorative tape – sticky tape sometimes comes in pretty designs, and you can use it a bit like ribbon with strips of it across your book.  Washi tape is another type of tape that can be used the same way.
  • Stencils can be used to make patterns or pictures.
  • Stamps and inkpads are a quick and easy way to decorate plain paper, but if you don’t have either of those things, you can use paint and chopped potatoes (cut into a square or triangle shape), the end of a carrot or other sliced fruit or vegetables to make your own stamps.  Wire, foam stickers and different size lids can all be used too.  Later in the year we will have a Free Fun Friday about this!

Do you have any fun book cover ideas?  If so, you can tell us what they are by leaving a comment.  Happy book covering!

Free Fun Friday – Alphabet Travel Game

Free travel game, alphabet practice, children

Free craft, sewing, games, ideas, childrenWelcome to Free Fun Friday!  Sometimes we come up with ideas that don’t fit in our magazine Imagine. Make. Believe, because they don’t suit the theme or we already have enough projects.  We decided we would like to share some of these ideas with you on Fridays, for free, and for fun!  They may be a game, a craft, a sewing project, or a printable, or something completely different, so come back every Friday so you don’t miss any… and tell your friends about Free Fun Friday!

Most Friday nights we travel about 15 – 20 minutes in the car, to drop one person at youth group, and the rest of us go to a friend’s house.  This isn’t very far, but it is the end of the day, and the week, so some of us are feeling a little tired and grumpy.  Sometimes, when one person gets bored in the car, they may annoy their brother or sister or parent, just for the fun of it.  This is never a great idea, because they will probably get in trouble, and it is not normally fun for the other person, especially when they are tired and grumpy.   We came up with this fun Alphabet Travel Game to fill our Friday car trip, which is great because it keeps eyes and minds busy, and is a fun way to practise the alphabet.

Free travel game, alphabet practice, children

Aim of the Game:

To be the first to complete the alphabet by finding letters on signs or number plates.

What You Need:

  • A vehicle to travel in
  • Knowledge of the alphabet and be able to recognise letters.

Rules of Play:

  1. Starting at the beginning of the alphabet, call out the first letter when you find it on a sign or number plate outside your vehicle.  For example if I saw a sign that said ‘Brainy Soup’, the first letter of the English alphabet is ‘A’, so I would call out ‘A’, and then, ‘B’ because that letter is also on the sign.  There is no ‘C’ on the ‘Brainy Soup’ sign, so I would have to wait and find ‘C’ somewhere else.  Another person in the car may not see the ‘Brainy Soup’ sign, but they may have found a different sign that said ‘You can buy it now!’, so they would call out ‘A’, ‘B’ and ‘C’ because all those letters are on that sign.  They would then have to wait and find a ‘D’ somewhere else.
  2. Each person is trying to complete their own alphabet, and they call out the letter they are up to, when they find that letter.
  3. Letters can not be found on or in the vehicle you are travelling in.
  4. You have to see the actual letter to call it out.  That means you can’t guess, and you can’t remember letters from another sign that you saw earlier.
  5. Once you have completed one alphabet, you can keep going onto your second and third alphabet.  Sometimes one person will be on the first alphabet, when you are nearly finished your second.  It can be really easy and quick to catch up though.
  6. If no-one else in the vehicle wants to play, you can play the game by yourself, but don’t call out the letters, as that can be annoying to others when they are not playing.  Say them in your head, and see how many alphabets you can complete before you get to your destination.

Have a fun Friday!

Related Posts Plugin for WordPress, Blogger...