How to Stitch a French Knot

How to Stitch a French Knot, sewing, basics, stitching, embroidery, kids, tutorial

How to Stitch a French Knot, sewing, basics, stitching, embroidery, kids, tutorial

The useful, but dreaded French knot!

Do you avoid French knots, because you can never get them looking nice? Maybe you have never been taught how to stitch one?  Or maybe you would like to teach your children this useful stitch?

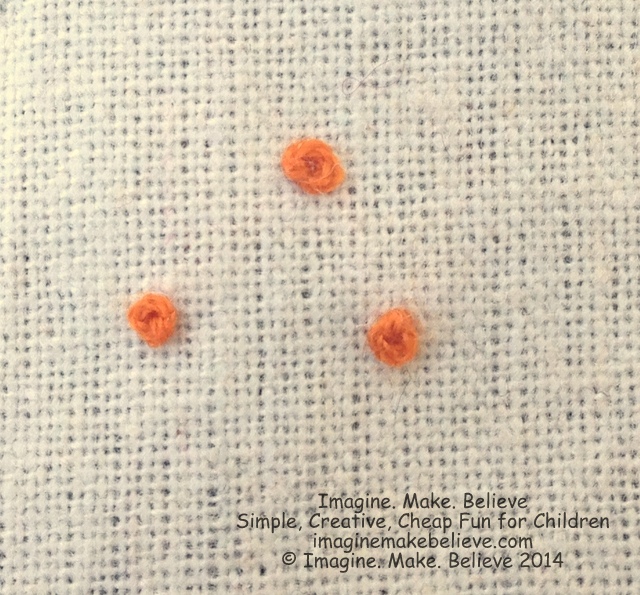
French knots are the perfect stitch to represent small round objects in your stitching and embroidery, like eyes on a person or animal, spots or dots on tea cups, clothes and other items, or small flowers in a garden.  The uses are endless, and there are many stitching patterns that include French knots.  We have used them as eyes on the stitched three-dimensional caterpillar that you can find in the Imagine. Make. Believe – Issue 2 – Bugs and Beetles magazine, as well as on the small ladybug stitching template that you can also find in that issue.

How to Stitch a French Knot, sewing, basics, stitching, embroidery, kids, tutorial, french knots At a young age, Janelle was fortunate enough to be taught how to stitch a French knot by an expert, her mother, Val Laird. Janelle has in turn, taught each of her children how to stitch a French knot too, as the need has arisen.  What she has discovered is that:

  1. French knots can be taught to 6 and 7 year olds.
  2. French knots stitched by children can be as good as, or better than those that have been done by adults.
  3. French knots aren’t as hard as you think.
  4. French knots are easy if you know what to do with the thread and the needle.
  5. With a little practise, anyone can stitch a French knot!

Our How to Stitch a French Knot tutorial goes through each step with instructions and diagrams, and is easy enough for children to follow.  To get started, click on the button below to access our free tutorial.

How to Stitch a French Knot, sewing, basics, stitching, embroidery, kids, tutorial

We hope that after a little practise, French knots won’t be the dreaded stitch any more, and that you will feel confident to stitch them, whenever the opportunity presents itself.  Let us know how you go, in the comments below!

How to Tie a Slip Knot

How to Tie a Slip Knot, knitting, crochet, knot tying, basics, craft, kids, tutorial,

How to Tie a Slip Knot, knitting, crochet, knot tying, basics, craft, kids, tutorial,

Slip knots are useful knots that come in handy for starting off knitting and crochet.  They are sometimes used in other craft projects too, and we found we needed one to start off a spider’s web that we have instructions for in the Imagine. Make. Believe magazine – Issue 2 – Bugs and Beetles.

Our free How to Tie a Slip Knot instructions and diagrams are suitable for children to follow and so you will be tying slip knots in no time at all!  Click on the button below for all the instructions.

How to Tie a Slip Knot, knitting, crochet, knot tying, basics, craft, kids, tutorial,

So whether you need a slip knot for a spider web or other craft projects, or to start you off on your knitting or crochet adventure, they are not hard to do once you know how.

We hope you have great success tying slip knots, so let us know how you go!

How to Measure and Cut a Strip of Paper

How to Measure and Cut a Strip of Paper - paper, card, papercraft, ruler, paper strip, children, kids, craft, activities

How to Measure and Cut a Strip of Paper - paper, card, papercraft, ruler, paper strip, children, kids, craft, activities

Many papercraft activities require measured strips of paper or card.  Some children may not know how to measure and cut a strip of paper, so we have designed a free tutorial that they can follow.

The instructions are available by clicking on the button below.

How to Measure and Cut a Strip of Paper - paper, card, papercraft, ruler, paper strip, children, kids, craft, activities

This tutorial will come in handy for our Easy Insect Antennae Headband instructions, to be released on Friday, as they use a strip of paper or card.  They are quick to make, great for dress up fun, and they go with the Imagine. Make. Believe magazine, Issue 2 – Bugs and Beetles, where you will find lots more themed activities and a whole lot of party ideas too!

If you like these ‘How to Measure and Cut a Strip of Paper’ instructions, you may also like others in our ‘How To?’ series too!

Happy crafting!

How to Make Less Mess With Glue

How to Make Less Mess With Glue - junkmail, glue, children, kids, craft, activities

How to Make Less Mess With Glue - junkmail, glue, children, kids, craft, activities

Craft and art can be messy activities, especially with children involved! Mix that with glue, and you can be in for a real messy ‘treat’!

There are a few simple tricks that can make crafting with glue less messy.  The type of glue used can cause more (or less) mess than others:

  • Use not so messy glue – This is usually in the form of tapes and other sticky, non messy adhesives.  We sometimes use double sided tape for this reason, and to help the project have less glue mess on it too.
  • Use a glue stick – If the project involves gluing paper to paper, a glue stick can be a less messy glue option.
  • Use a small tipped glue bottle for liquid glue – The bigger the tip on the end of a glue bottle, the more glue can ooze out, and the more mess it can make.

How to Make Less Mess With Glue - junkmail, glue, children, kids, craft, activities

With most glue you will need to protect your work surface.

For years we used to spread out loose pieces of paper over our table, only to have them end up on the floor and all over the place because they were easily shifted, or they would be blown off the work surface.  However, a little while ago, we discovered a very simple solution to the problem.  Junk mail! (Also known as ‘advertising material’.)

That’s right!  Most of the time junk mail ends up in the bin, but here is a way to use it before it ends up there, and it will also help to make less mess with glue!  If you don’t have junk mail, old telephone books and other scrap paper can be used instead.

  1. All you need to do is grab one multipage piece of junk mail – we use the glossy junk mail, and if using liquid glue, thick pages work better.
  2. Open the junk mail to the first double page and lay it flat on the table or work surface.How to Make Less Mess With Glue - junkmail, glue, children, kids, craft, activities
  3. Place the item to be glued on top of the junk mail.How to Make Less Mess With Glue - junkmail, glue, children, kids, craft, activities
  4. Spread glue on the item and position it into place.How to Make Less Mess With Glue - junkmail, glue, children, kids, craft, activitiesHow to Make Less Mess With Glue - junkmail, glue, children, kids, craft, activities
  5. If there is a section on the two junk mail pages free from glue, place the next item there and repeat step 4.
  6. When both pages of the junk mail have glue on them, turn the page, so that you have two new unglued pages. The glue will now be contained inside the previous pages, and will stop the glue from accidentally sticking to the table or the project you are working on.
  7. Once you have finished gluing or used all the pages in the junk mail, place the junk mail in the recycling bin if you have one, or put it in the garbage.

Easy!

We hope you have fun with your next craft or art project, and in the process make less mess with glue!

And… if you are little intrigued as to what Annie is making in these photos, come back soon and you will see or have a guess in the comments!

How to do Back Stitch

How to Do Back Stitch, sewing, basics, stitching, kids, tutorial

How to Do Back Stitch, sewing, basics, stitching, kids, tutorial

Back stitch is a useful stitch for decorative stitching, embroidery, and sewing.

It is one of those stitches that we use a lot here at Imagine. Make. Believe.

It is an easy stitch, once you know how, and one of the best stitches to use if you need a solid outline of thread around a shape.

Back stitch can be stitched in straight lines or curves, and it is also suitable if you want to sew two pieces of fabric together by hand.

We have complete instructions and diagrams that have been designed for children to follow, so click on the button below to download our free instructions.

How to Do Back Stitch, sewing, basics, stitching, kids, tutorial

We hope you have great success with back stitch!  Let us know by commenting below.

How to Sew on a Button

How to Sew on a Button, sewing, basics, stitching, kids, tutorial, buttons

How to Sew on a Button, sewing, basics, stitching, kids, tutorial, buttons
Buttons!  Do you like buttons?  Janelle remembers when she was a little girl, running her hand through her mum’s button jar, and sorting them into sizes and colours, just for fun. She still loves buttons and has a big stash of her own now! She still likes to run her fingers through the buttons too!

The children here used to love sorting the buttons as a fun activity, and have carefully sorted them into colours so that we only have to grab the right coloured container when we need it.

Buttons, colour sorted, red, yellow, green, blue

Buttons are such useful things!

Of course you find them mostly on clothes, but they can also be seen on bags, cushions, soft toys (softies) and other items.

They can be used to represent many things including eyes, noses, lollipops, flowers or flower centres.  

Do you know how to sew on a button though?  It is quite easy once you know how!  

It is a good skill to have, because you never know when a button might pop off your clothes! 

We have made a free, step by step tutorial with diagrams, and easy to follow instructions, simple enough for children to follow.  Just click on the button below to access the file.

How to Sew on a Button, sewing, basics, stitching, kids, tutorial, buttons

Have fun sewing on those buttons!

How to Do Ladder Stitch

How to Do Ladder Stitch, sewing, basics, stitching, kids, tutorial

How to Do Ladder Stitch, sewing, basics, stitching, kids, tutorial

Have you heard of ‘ladder stitch’?  It looks a bit like a ladder if you could see all the stitches! Most of the thread gets hidden away in the folds of the fabric and all you get to see are the ‘rungs’ of the ‘ladder’.

We use the stitch often to sew the gaps closed in softies or stuffed fabric items, and it can be used to sew fabric hexagons together and bindings down on the back of quilts.  The stitch can also be used in certain beading projects.

Click on the button below for our free tutorial on how to do ladder stitch.  The instructions and diagrams are designed to be easy enough for children to follow.

How to Do Ladder Stitch, sewing, basics, stitching, kids, tutorial

Let us know how you go!

How to End a Thread

How to End a Thread, sewing, basics, stitching, kids, tutorial

How to End a Thread, sewing, basics, stitching, kids, tutorial

Have you finished your stitching or sewing, and not quite sure how to end a thread?

The Imagine. Make. Believe children have sometimes found ending a thread tricky… have you?  Once you know how, it is not so difficult!  

Have a look at our free tutorial for two different ways that you can end a thread, one with a knot, and one with a tail.  We also explain when to use each method.

We have written instructions and diagrams that are easy enough for children to follow, so we hope this will help you finish your project!

Click on the button below to see how!

How to End a Thread, sewing, basics, stitching, kids, tutorial

Related Posts Plugin for WordPress, Blogger...